How to make a cake like mine.
Sunday, August 26th, 2012So I got this request to share how I make my cakes. I had no idea how to put this post together so as chaotic as it is, I hope it does help you somewhat.
Well in the first place there is the cake, then the filling and then the fondant. Before I started making cakes I have been looking at many tutorials, video tutorials and picture of all kinds of cake and cupcake baking and decorating. Checking on the tools and techniques and materials they used. Then when I finally got enough courage to get started, I decided what kind of cake I wanted to make and what I wanted it to look like. Again I looked at tutorials searched recipes and how-to’s, just this time more specific with the wishes I had. I went looking at online stores where I could buy materials, checked prices, looked at ebay for the tools and search the stores in the mall to find what I needed for reasonable prices.
Most of my tools I bought off ebay because I don’t have a lot of money to spend and I did not mind waiting a little longer till I had everything I needed at first, I bought from international sellers. Most times my items came from hongkong. The search terms I used where: ” fondant cakes decorating”. On the left side of the search results u can select a number of things you want to define your search a little more with. I checked: “world wide” and “free shipping” , because I want to be sure that when I bid on something that they actually deliver it to me across the globe and I don’t want to pay a lot on unexpected delivery costs and I dont want to spend /waste time asking the seller how much shipping to me would cost. From the drop down menu at the top right I select: ” price plus shipping lowest first”.
So, THIS would be the results and from there I start looking at everything and bid on the things I need and want.
When I first started to make cakes I decided to make a heart shaped cake with pretty little roses on it because I loved how pretty, romantic and fragile they look and wanted to learn how to make them.
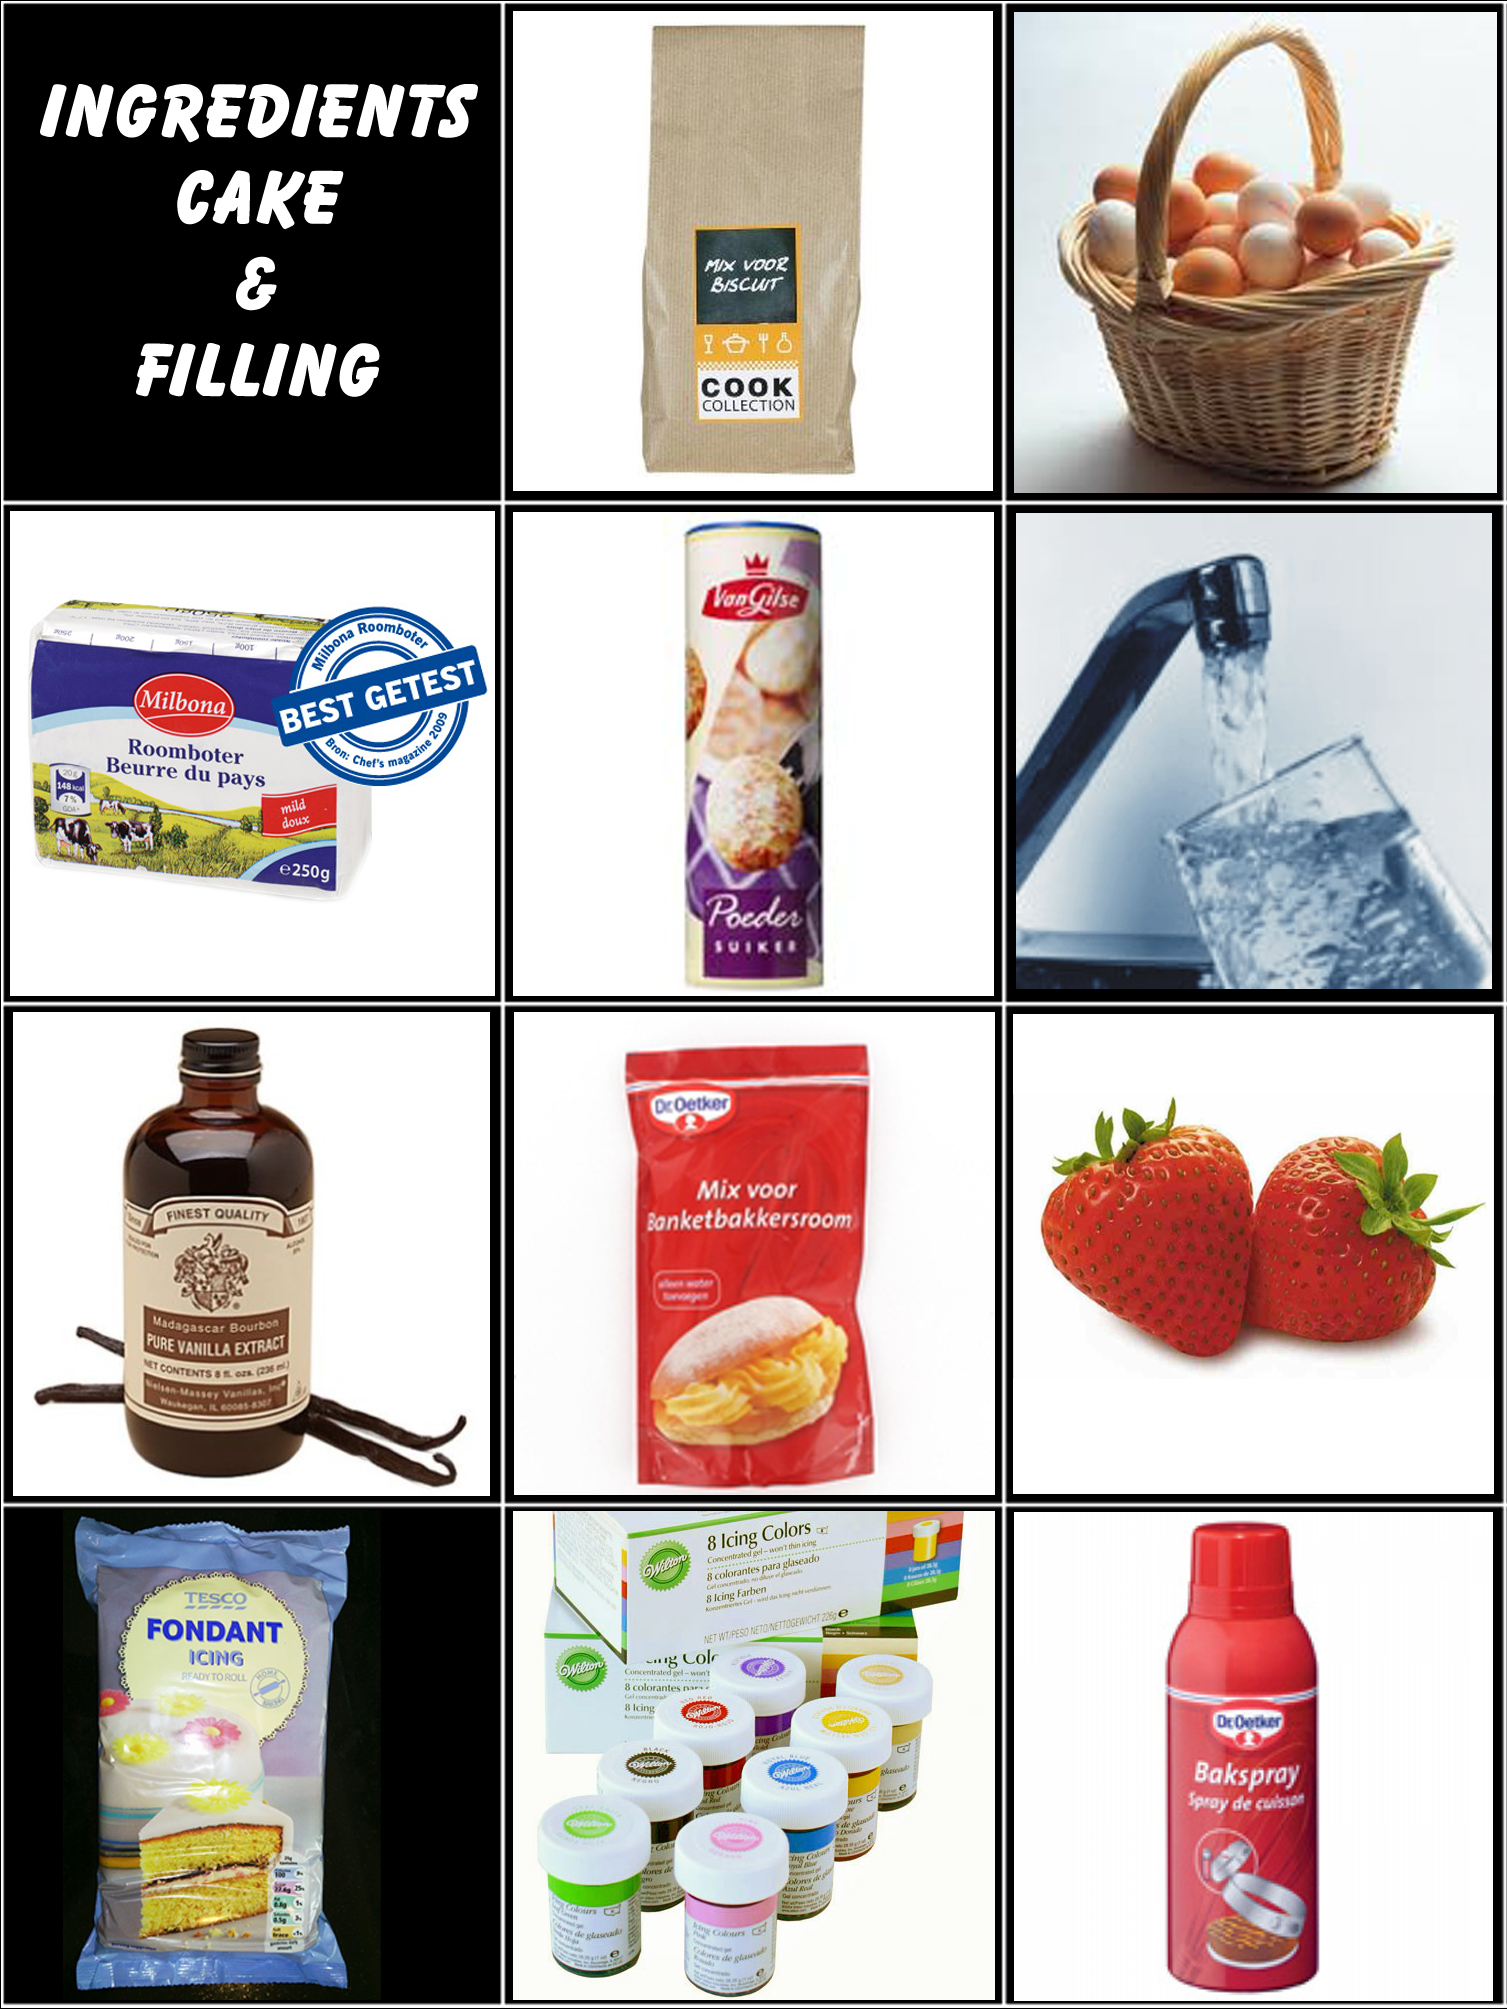
The images below here shows you all the ingredients I had and used when I made that first cake.
You see from left to right, top row first: biscuit mix, eggs, butter, powder sugar (confectioners sugar), water, vanilla extract, bakers cream mix (custard cream), fresh strawberries, read made roll fondant, oil based food coloring and baking spray to keep your cake from sticking to the pan.
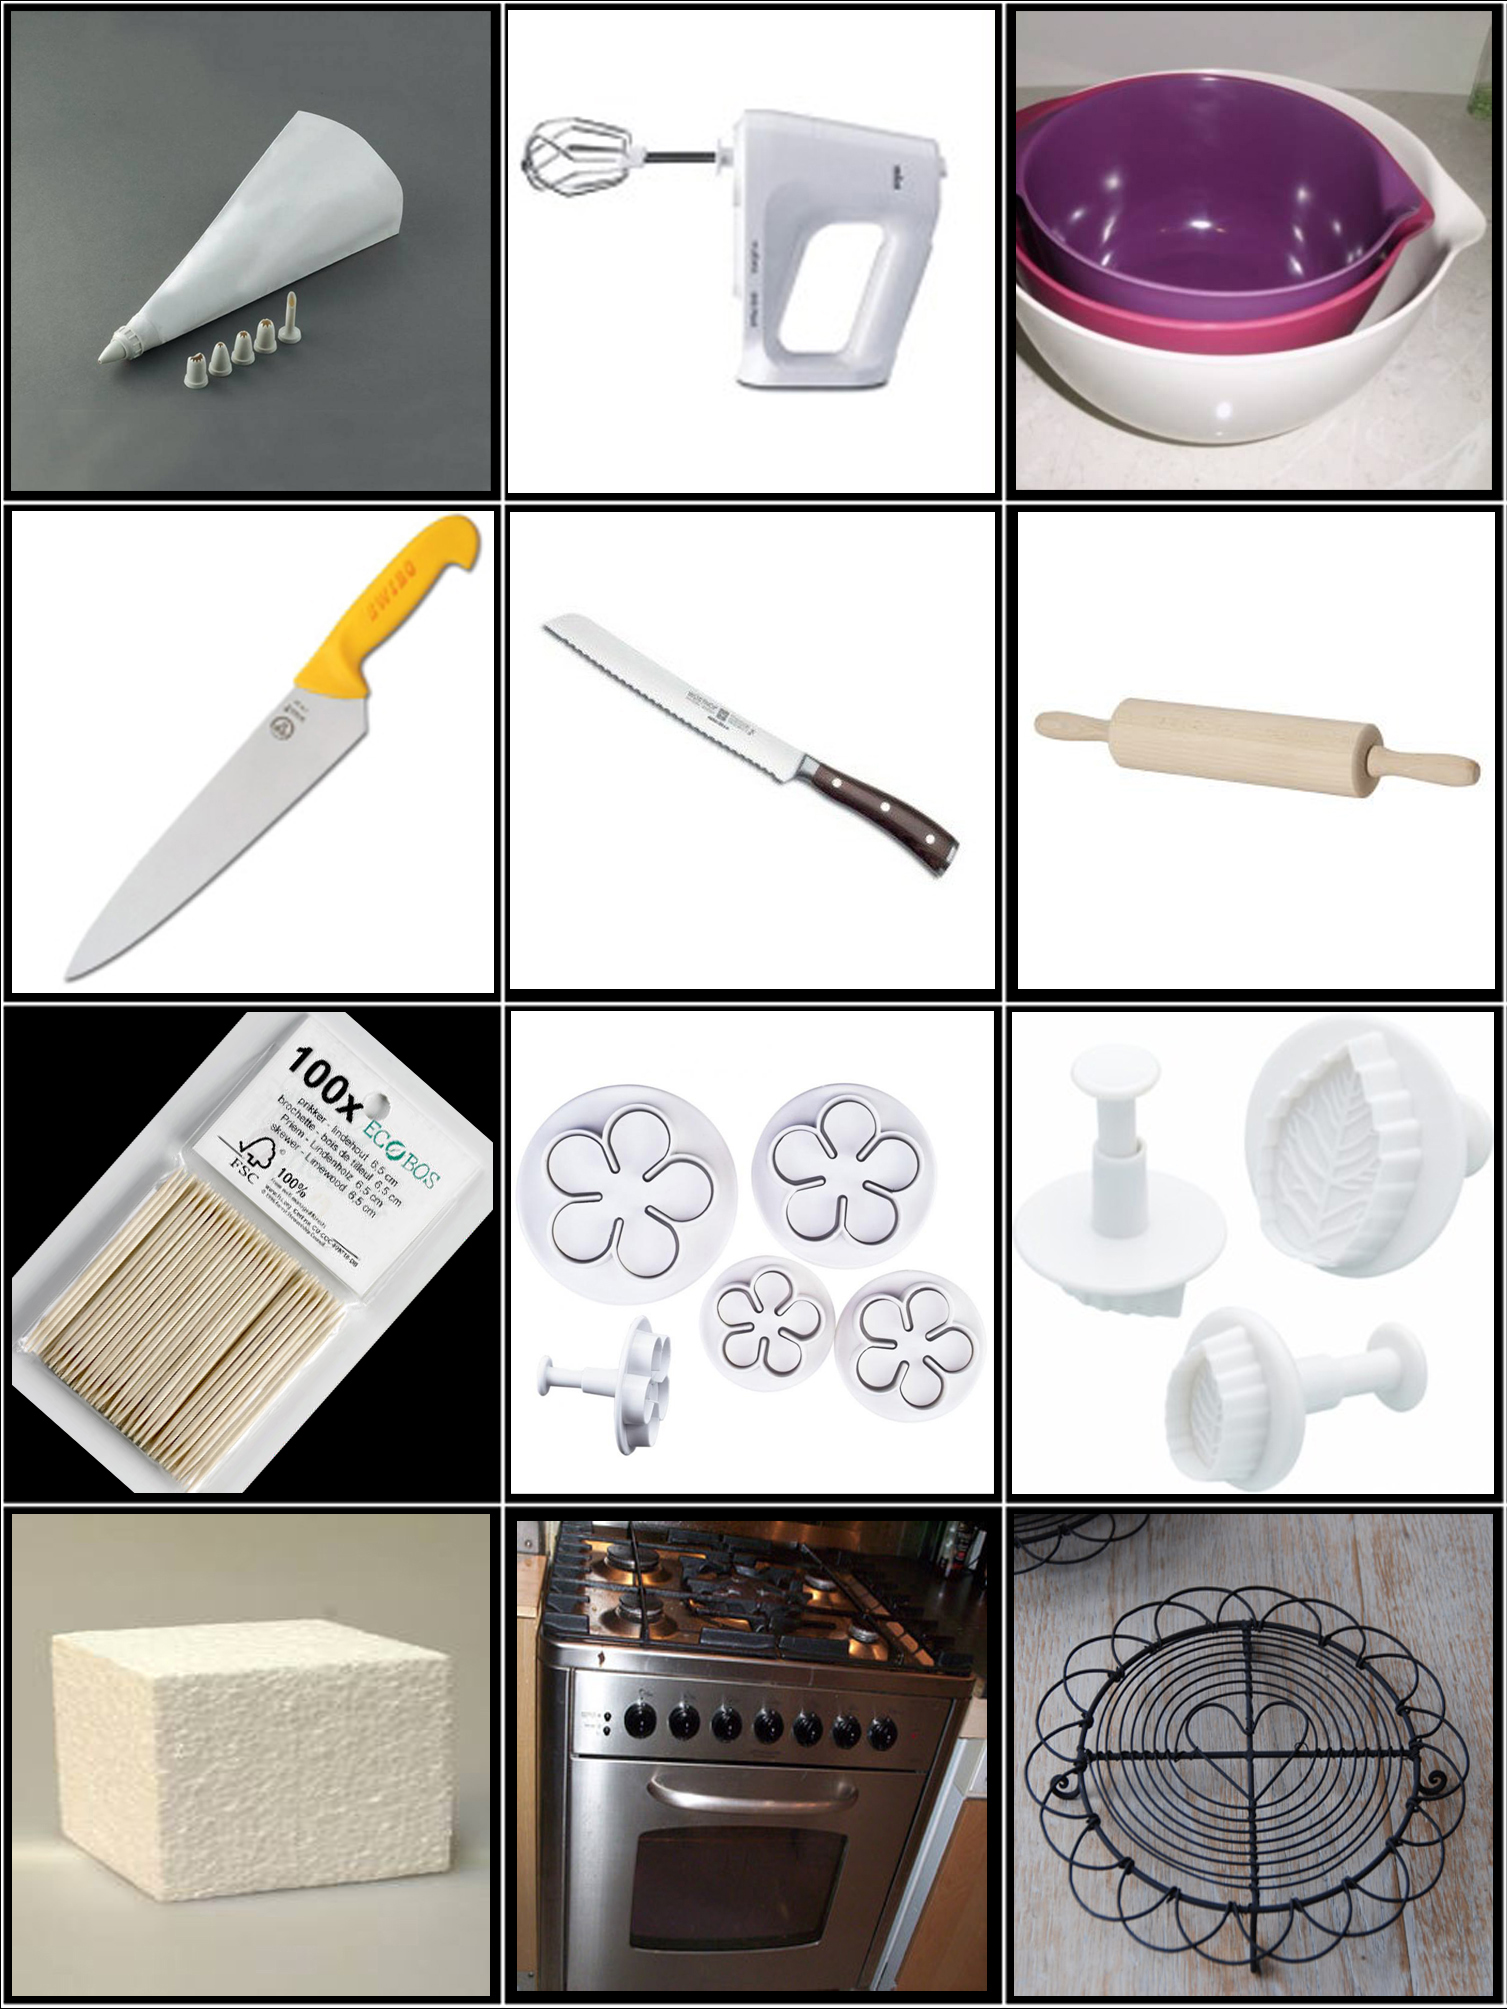
And here in these pictures you see the tools I used, they seem to be a lot of tools but most of those tools you probably already have:
Again from left to right and top to bottom: Piping bag, A mixer, 3 mixing bowls, a large butcher knife, A bread knife, wooden rolling pin, toothpicks, cutting set for the roses, cutting set for the leafs, foam (just leftover packaging), an oven, a coaster for pans to let the cake cool off on.
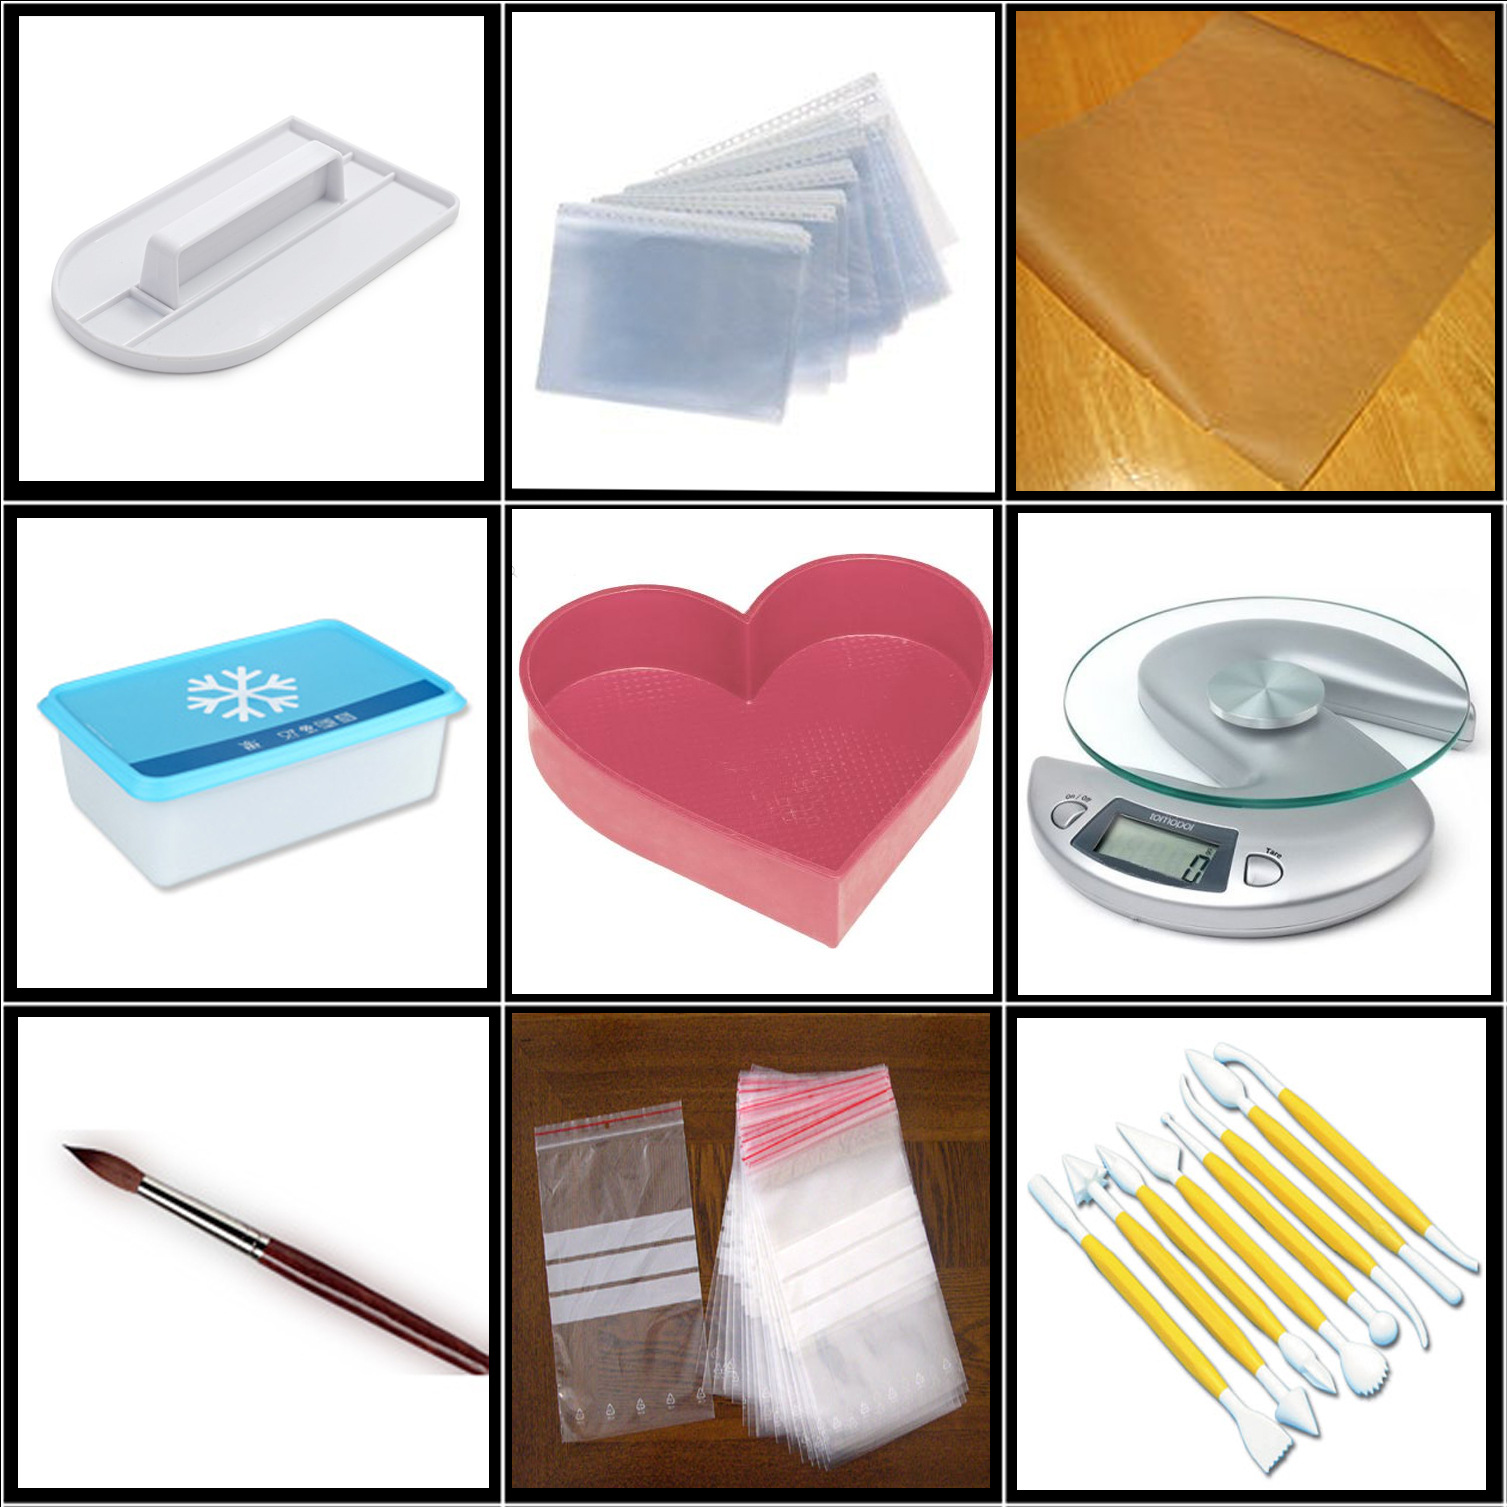
And the second set of tools I used:
And once again from left to right top to bottom: Fondant smoother, transparent document folder, baking paper, plastic box, silicone heart shaped baking pan, scale, brush, zipper bags and a modelling tool set.
To make the mix I simply followed the recipe on the package. I bought a kilo pack of mix but that’s plenty for several cakes, depending of course on the size. I bought it in a cooking shop where they sell a lot of fun cooking things. I made enough for the size of my cake and bake the cake following the directions on the pack.
When the cake is done (usually about 30 -45 minutes in the oven) You take her out of the baking pan and turn her carefully upside down on top of a rack where it can cool off. I used a coaster to put hot pans on because that would come the closest to a real cool off rack for cakes. Yeah they do exist but I did not spend money on one yet since it goes perfectly well with the coasters for my pans. Every ten minutes I turned the cake a few degrees so the metal of the racks would not get too deep into the cake bottom. IF the shape of the rack gets into the cake bottom it does not matter so much because keep in mind that the Top of the cake becomes the bottom so that’s why you have to turn it around to cool off upside down so you don’t get the pattern of the cooling rack into your cake top.
While the cake is cooling down you can make the butter cream, you can buy a mix but its pretty easy and quick to make so you can save yourself that money and make it from scratch in the same time. This butter cream is meant to spread in between the layers and make a small protection wall so your filling doesn’t touch the fondant. Its also used to spread on the outside of the cake to make your fondant stick to the cake and make the cake perfectly smooth before you add the fondant cover. I added a tiny bit of vanilla extract to give it a nicer taste. If you use a different color then white to cover your cake then you might want to add a color to your butter creme, but do this at the end of the mixing when you are almost done and add very small doses , mix and if the colors is not the way you like then add some more.
Basic cake recipes:
- http://www.wilton.com/cakes/making-cakes/
- http://www.wilton.com/recipe/Basic-Yellow-Cake
- http://baking.about.com/od/cakes/r/basicyellow.htm
Recipe butter creme:
Ingredients:
250 grams butter at room temperature
250 grams powder sugar (confectioners sugar)
Vanilla extract (optional)
food color (optional)
Materials/tools:
Mixer
Bowl
sieve (for the sugar)
Instructions:
Put the butter in a bowl and mix it till its completely smooth.
Put the powder sugar (confectioners sugar) through the sieve in the bowl.
Mix it for at least ten minutes.
Add vanilla little by little while you try the taste till you are satisfied.
If you want to add a color you do this last. Mix really small portions into the butter creme till you reach the requested result.
DON’T put your bowl with butter creme into the refrigerator because this will make your butter creme hard again and we want to keep it smooth. Just set it aside till you are ready to use it.
After you filled and covered your cake with the butter cream put it in the refrigerator for a little bit. Take it out and you can smoothen the butter better around the cake. Then you can add the basic layer of fondant on the cake.
Custard Cream filling
The custard cream I used comes from a ready mixed package as well and I simply follow the instructions on the package. I have however looked on the web and found a few recipes that sound good to me to be used instead of the one I used.
Custard cream recipes
- http://www.food.com/recipe/custard-cream-filling-39522
- http://www.cooks.com/rec/view/0,166,155191-255200,00.html
- http://www.food.com/recipe/cream-custard-cake-filling-190976
The strawberries
Well that’s the easiest part. Wash them and let them dry and cut them in slices. After you added the butter cream wall and put the custard filling onto the cake layer, you can put the strawberry slices on top of your custard filling. I basically covered the whole custard because I think you should taste the fillings with every bite. Then the layer of cake that goes on top of the strawberries you spread in with butter cream first so the cake does not get soaked from the strawberry juice.
The fondant
I have used fondant because I don’t like the taste of marzipan and fondant is whiter then Marzipan. I think its just a matter of trying and taste whichever you prefer. When you color the fondant with food color then make sure its oil based food color and not water based. When adding the color to the fondant always do small parts and use a tooth pick to add the color to the fondant because a tiny bit already gives a big result. If you want hard colors like red and black and dark blue I suggest you buy them already colored because that’s like impossible to make using coloring gels at home. just have to try with the fondant and make the decorations a few days ahead if possible so they can harden up. DON’T leave them drying in the light too long for they will lose the color you gave to it if you leave it too long.
I have used the packing foam to stick the roses on with toothpicks so they would stay straight up. To give the rose leafs some shape I used aluminium foil that I crumbled a little bit so I could let the leafs dry without them laying flat and straight.
Here are some tutorials that can help you making the roses and getting the fondant smoothly onto the cake. I have just watched a lot of tutorials and learned a lot from them. Tutorials might not be exactly what you need or are looking for but they often contain little tricks that you can use at one point.
Fondant tutorials:
- http://www.wilton.com/technique/Full-Bloom-Fondant-Rose
- http://www.wilton.com/decorating/browse.cfm?thm=Flowers lots of good tutorials on this site not only about fondant but about the whole cake making thing.
- http://www.youtube.com/watch?v=_g1Nyd-LhAY just love this guys cakes and how easy he makes everything look like lol
- http://www.youtube.com/watch?v=1R8MsL-5oKA&feature=related make roses without cutter and coloring fondant
- http://sugarcoatedchronicle.blogspot.nl/2010/09/perfect-fondant-tips-for-covering-cake.html some help full tips and info
- http://www.duskyroseveiners.co.uk/page_1303586.html another pretty rose
- http://www.youtube.com/watch?v=zqwWPCSPP-E An awesome dragon tutorial
- http://www.felicitaartjes.nl/homepage/show/pagina.php?paginaid=241015 Hello Kitty 3D puzzle cake. This photo tutorial is in dutch but I think the pictures speak for them self and even show useful info on other subjects of cake filling and such.
- http://debbiekoenig.com/2009/08/28/how-to-use-fondant-for-absolute-beginners/ fondant tutorial for absolute beginners


 Ever tried to cut out a furry animal in photoshop to copy paste it onto a different image and did it look like the animal has been hit by a grass mower? Now you can keep from this sort of digital animal abuse XD. Simply follow the steps in my tutorial and keep our pets save and happy :).