How to make “Puss in Boots”
 Ever tried to cut out a furry animal in photoshop to copy paste it onto a different image and did it look like the animal has been hit by a grass mower? Now you can keep from this sort of digital animal abuse XD. Simply follow the steps in my tutorial and keep our pets save and happy :).
In this tutorial you will learn how to re-draw the fur on animals you have masked or cut out and chopped. This tutorial also includes the use of quick-mask, more uses for the “fur redraw trick†a different way of making a shadow in grass, and many other tips and tricks.
Don’t mind you, I am still in the progress of restoring this tutorial so If it is not completed yet with all images, please check back in a day or so. Thank you!!
![]()
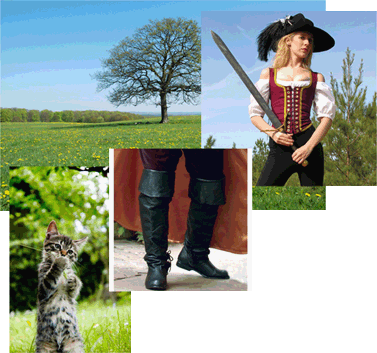
To create puss in boots I have used several sources images that I will post separately again during the tutorial. Here they are all at once…
![]()
Step 1
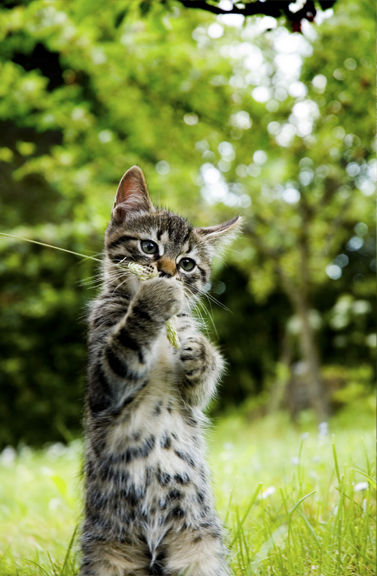
First source we need is the cat. I found this image at the time at sxc.hu. A large website with loads of free and royalty free stock-photo’s. Ofcourse you can use basically any animal for this tutorial as long as its furry.
![]()
Step 2
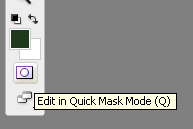
Then we will have to cut out the cat. I have done this using the quick-mask way. I will show you how. Open the source image with the cat and click on the quick-mask icon. Make sure you have your back and foreground color settings put on black/white as by default.
![]()
Step 3
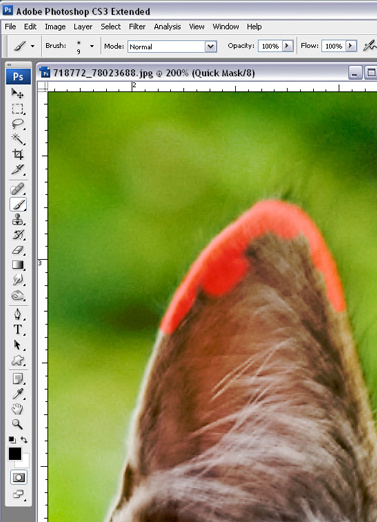
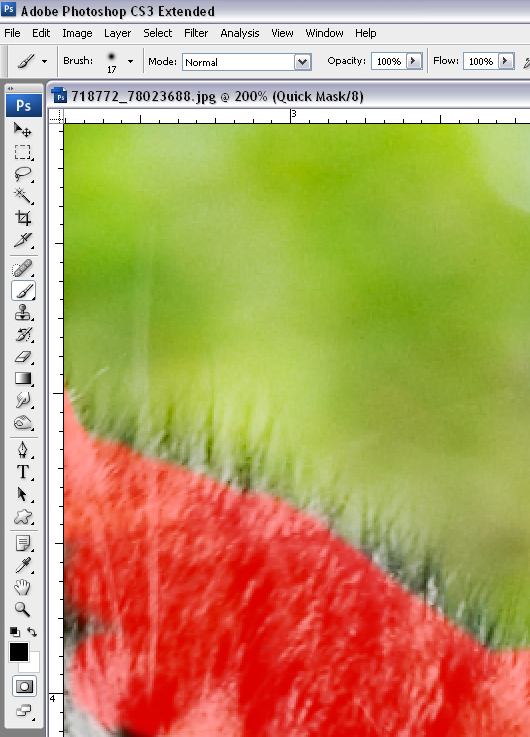
I have used a soft bush on size 9 for the parts where the edges are more sharp. I blow up the image to 200 % in this case since I don’t need to be extremely careful since we are going to redraw the fur so any mistakes we will hide later on anyways. While you “paint†the mask on the cat you will see the color red appears where you painted. Now if you make a mistake that you want to correct you can simply do so by using your eraser and switch back to your brush to continue masking.
![]()
Step 4
As we keep masking /brushing the cat we will come to parts where there’s more hair. We don’t need to mask it really precise.. just what is important is that you stay inside the cat.. As in.. don’t take anything of the background in the mask .. it works best to stay a little bit away from the outside border.. not too much.. the cat isnt on a diet :). You can also use a bigger size brush here…
![]()
Step 5
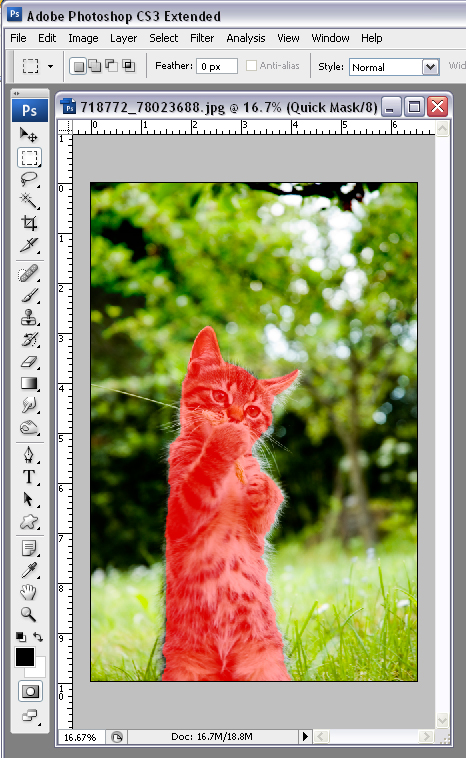
Here you can see the total result of my masking.
![]()
Step 6
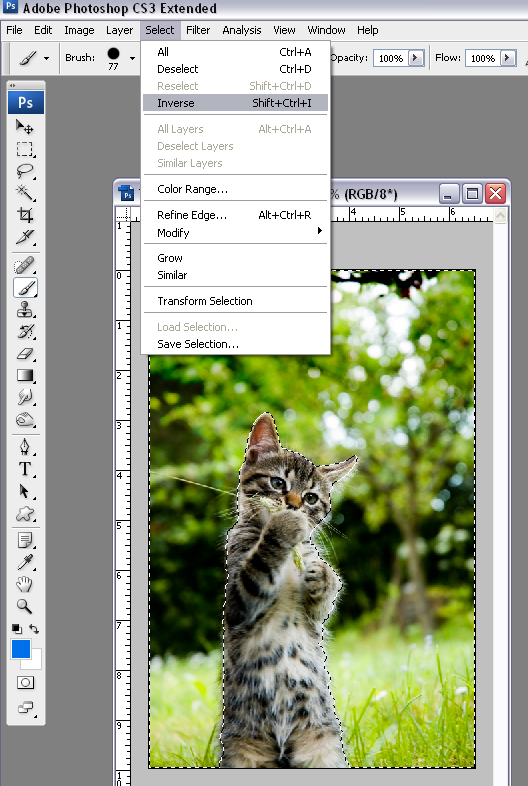
Click again on the quickmask icon as shown in step 3. You will see the part that was red is now a selection.
Click on select –> Inverse as shown on the image here. Or use CTRL + shift +I. you now have selected the cat itself.
![]()
Step 7
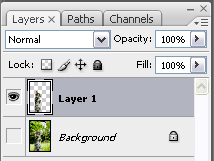
Now make a new layer (shift+ctrl+n) Copy the selection (ctrl +c) and paste (ctrl +v) it on the new layer.
![]()
Step 8
Make the layer with the original source invisible by clicking on the little eye icon next to it.
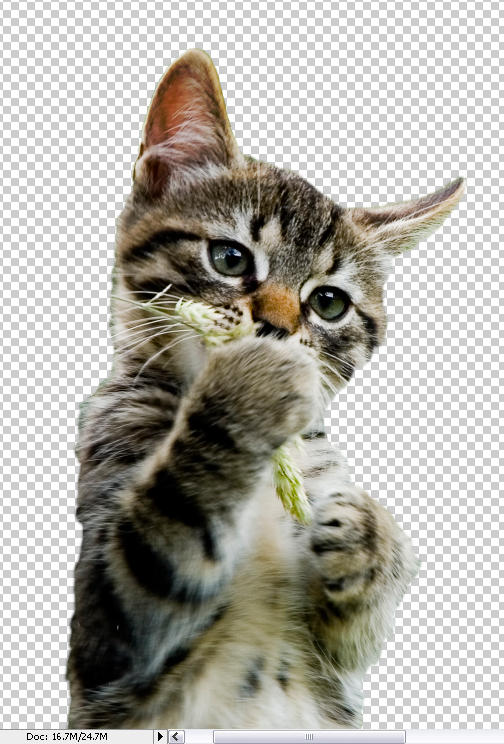
![]()
Step 9
And this is what you will have on your screen now.I have moved up the cat a little to the center of the screen so we have the room to add the hat and the sword and the boots.
If it doesnt fit on your screen later on while you work you can simply enlarge the canvas.(image -> canvassize)
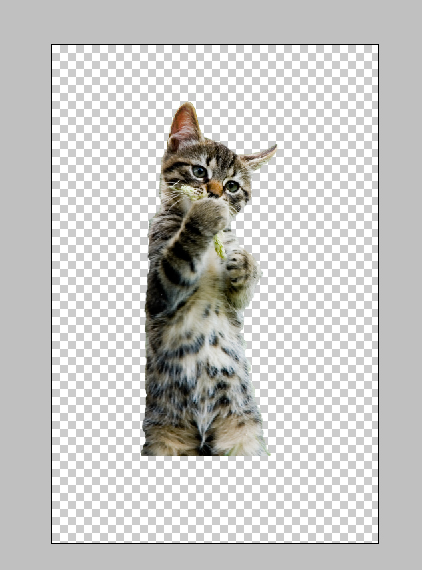
![]()
Step 10
Now we are going to our second source image.. leave your file with the cat open and save it from time to time so in case your computer crashes you still have most work saved… (that happened to me too many times in the past). Open the second source in photoshop.
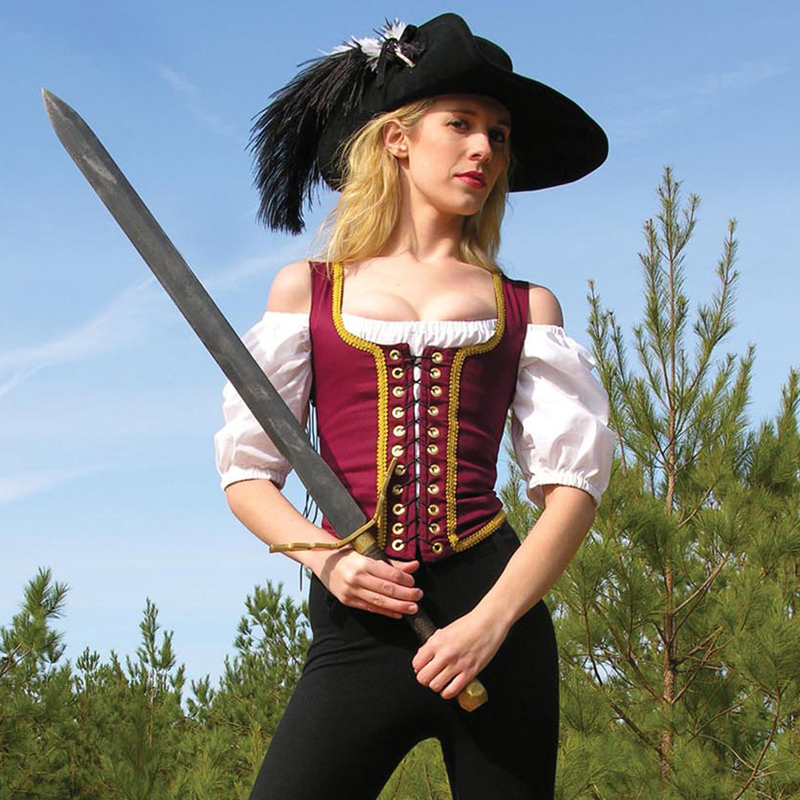
I have masked the hat the simulair way as I described how I masked out the cat starting at step 3, but now I used the softbrush 9 all the time all arround the edges because we dont need to redraw fur on the hat. Except ofcourse the feathers. You can use a taller size brush for that. It is ok if you take parts of the background with it since the backgrounbd is blue here and we are going to put it on a blue back ground so it will work out fine in the end.
![]()
Step 11
After cutting out the hat using quick-mask, copy paste it on a new layer on top of the cat the same way you copy pasted the cat in. I keep this short here now because you can simply go back in steps and check on how to mask. Then we are going to make the hat fit on the cat. Go to edit —> free transform (ctrl +t) and turn it till you have the right direction.
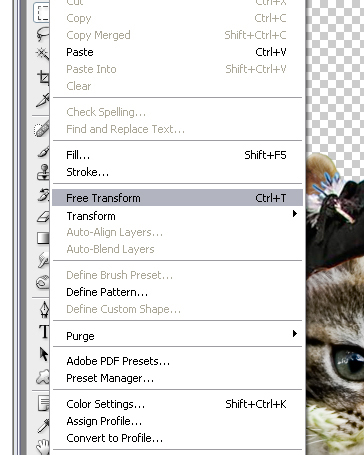
![]()
Step 12
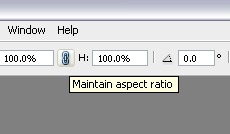
If the hat doesnt fit on the cats head we will have to resize it as well while in free transform mode still.. just make sure you click the lil cable/link icon as I call it ( you can see this in the picture here.)
![]()
Step 13
Now we are going to make the hat fit even better, using edit –> transform —> warp. You can pull the hat now at more points to make it fit better on the cats head.
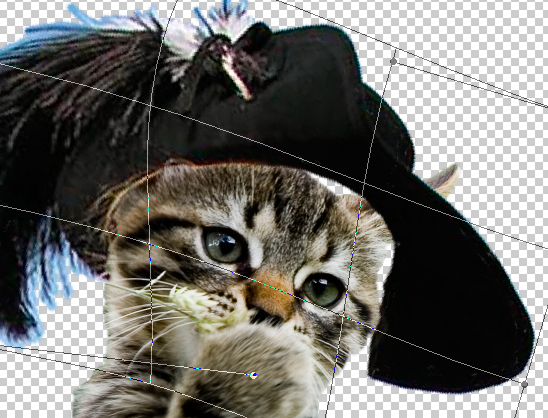
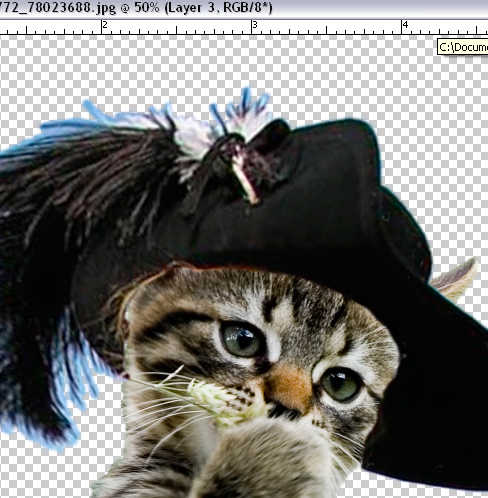
In this second image you can see that the hat fits much better now.
![]()
Step 14
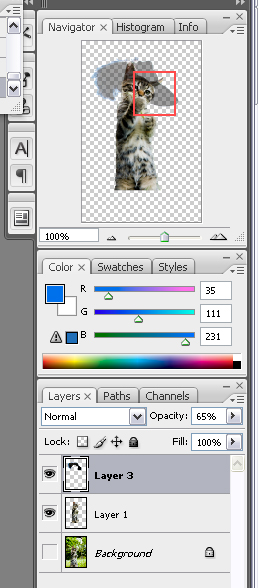
I am going to erase now a few parts that overlapped the cat too much. But we are not going to do that blind.
Set the layer with the hat to 65% opacity like in the image here.
![]()
Step 15
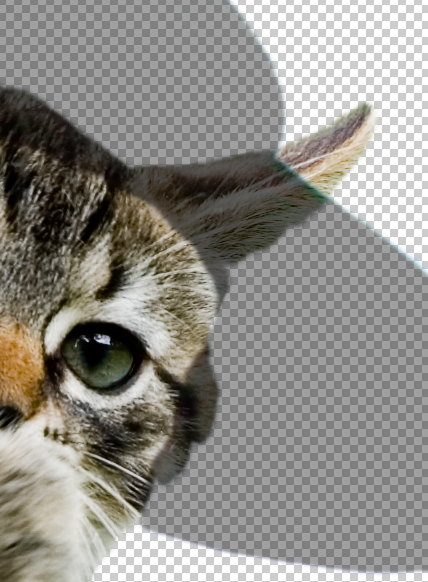
Looking at our work now you can clearly see where the hat overlaps the cat.
We do want the ear part covered so I dont erase that. but the other lilttle
parts that overlap the cat that I want to be gone.. I am going to erase using
the eraser does not need to be too precise but dont be too hasty either. the
easier the fixing up will be later on.
![]()
Step 16
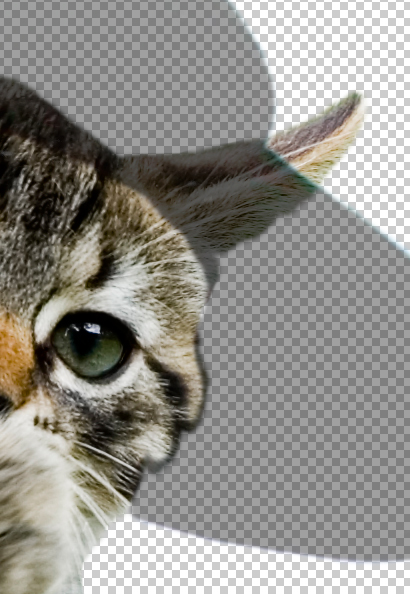
Here you see the result of my work. Compare it with step 15 :).
![]()
Step 17
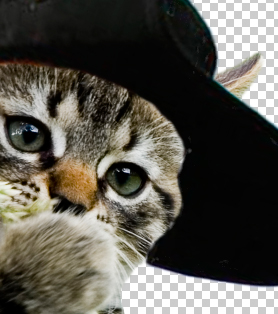
Now we can set the opacity of the hat back to 100%.
![]()
Step 18
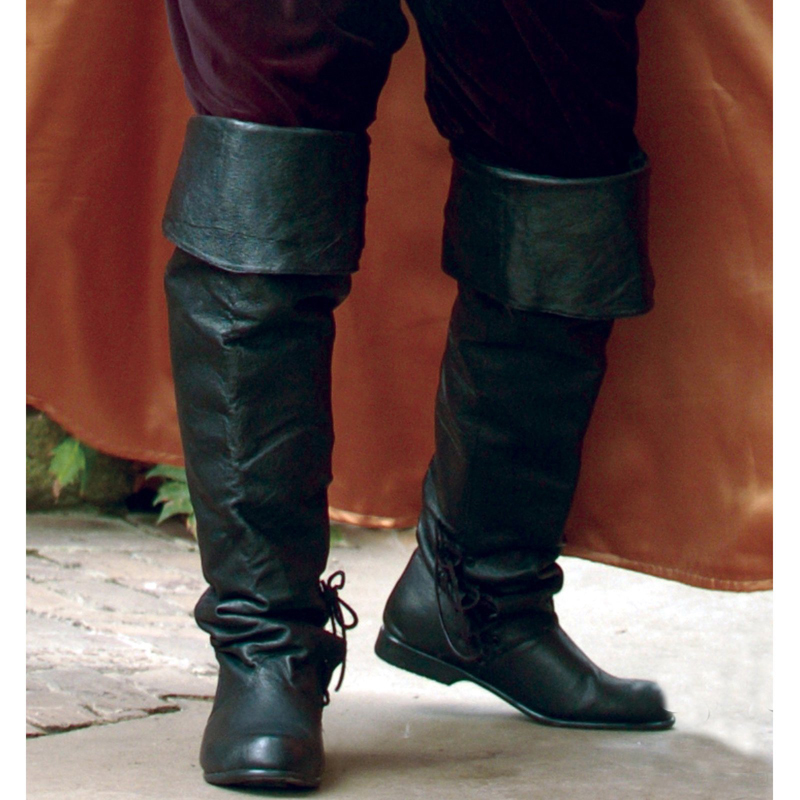
Moving on to the next source. The boots…
Here is our source with the boots.
But before we continue we are going to link the layers with the cat and the
hat together. So in case we have to move them arround, they move together so
we dont have to keep puzzling them in the right position again.
![]()
Step 19
Select the layer with the hat by clicking on it. Then hold down CTRL key and
click on the layer with the cat.
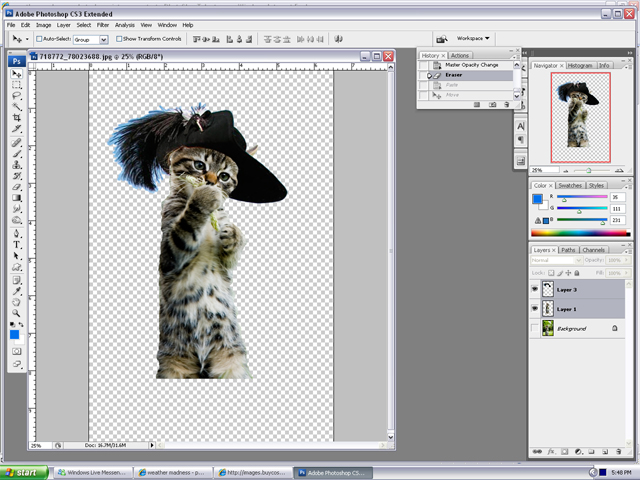
You see both layers are now turned grey and thus selected. Right lick on one
of the layers and select link layers.
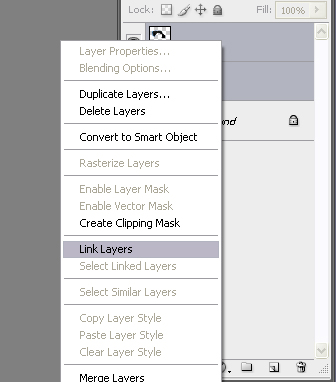
![]()
Step 20
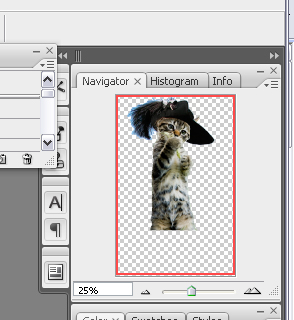
When you look at the navigation on the top right corner you can see the cat
is in the middle of the canvas.
We are now going to move up the hat and the cat.
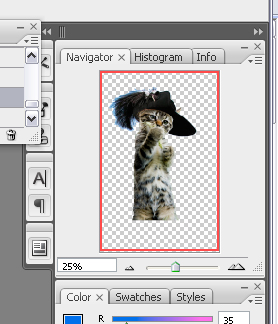
![]()
Step 21
Click on the move tool and move the cat with the hat upwards.
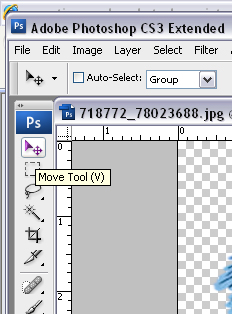
![]()
Step 22
In your navigation you will see now this.
![]()
Step 23
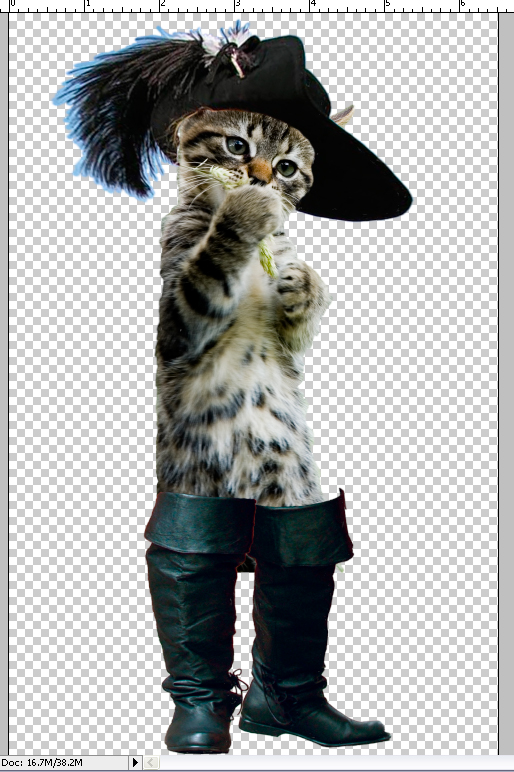
Now we are going to cut out the boots from the source image I allready gave
in step 21. We do this one by one the same way as we cut out the cat and the
hat, with the quickmask way as I have descibed it starting at step 3. This
time we also work more precise like when we maskd the hat and use a small
brush for the edges.
When we have done all the edges we can mask whats inside and copy paste it in
a new layer on top of the cat file like we have done with the hat in step 13.
Place the boots with the move tool at the desired place where normally the
legs would be. We also make the boots fit by changing the shape like the hat
in step 15.
![]()
Step 24
First we enlarge the canvas so the next step will fit on it. We do this by
going to Image –> canvas size or Alt + Ctrl + c.
On that window that appears select in the drop down menu where it reads
height, percent from the dropdownlist and set it to 150 %. Then click ok.
Link all the layers again together like I described in step 22 but also
include the boots now.
Move the selection down so you have more room for the sword.
Next we go back to the source image where we got the hat from in step 12 but
now we want not the hat but the sword.
Mask out the sword as you have done with the hat and the boots starting at
step 3 and copy and paste it on top of the other layers as described before
aswell. I am sure you are starting to get the hang of it after having it done
a couple times now.
Place the sword so that it looks like the cat is holding it with one paw and
resting it on the other as if hes inspecting it. We might have to work on the
grip a little bit to make it fit nicely.
Step 25
Create a new layer and place this below all the others.
Select a part of it with the marqueetool like I have done here.
Step 26
I filled up the selected rectangle with a blue color.
Step 27
Do the same with the bottom part thats not colored in yet but now with a lil
bit lighter color blue.
Step 28
Here we add the lines that will make the dark line between the floor and the
wall, using the line tool.
Select the line tool and change background color back to black and draw a
line completely from one side to the other side just a few pixels wide.
Make sure its excactly in the middle between both colors blue.
Duplicate the line and set the opacity to 65 %. Then move the line with your
move tool so it sits excactly on top of the other line.
Then duplicate this line too and now move it so it sits excactly below the
darkest line. The opacity of this layer is 65% aswell.
Step 29
Blow up the size of your image again using the slide below the navication
picture and erase little parts on all the layers where its needed.. like
arround the sword and the boots. clean up your work.. outlines and such need
to be erased using a small soft brush. I usualy use brush 9 or 5 so I can
work precise.
Step 30
Now we are finally moving on to where I explain how to redraw the fur.
First I start with the top paw of the cat. As you can see fur being redrawn
is definatly needed here…
click on the layer with the cat so its selected. With the rectangual
selection tool I selected the part where the paw is. Not too big a part and
not too small a part.. just the paw is what we need. Copy and paste the paw
on a new layer and move that new layer with just the paw on top of the layer
with the sword… since.. the fur we are going to redraw would look best if
they cover the sword a little no?
Step 31
Select the layer with just the paw and set your smudge tool like I did in
this image.
Size 2 and 72 % strength.
Start making strokes from the inside to the outside.. make sure you dont
stroke everytime in the excact same directions. Vary the strenght of your
brush and sometimes you might even want to vary the size of your brush
between 1 and 2. I usualy vary between 40 and 95. The more time you put in
this and the more carefull you do this the better the result will be at the
end. I also usualy blow up my image and here it is at 200%.
Step 32
Then the next step is to cover up the brush strokes we did in step 34 just
with a few strokes starting even a little further away from the edge and
stroking it till a little further where out strokes from the first step
started so we create another layer of fur actualy.. these strokes should not
need to be too many its just to add more depth to the fur. As you can see in
the result here, it looks now very realistic like the rest of the cats fur
:).
Step 33
Now we are going to do the same with the legs of the cat.
Go to the cat layer and select the part with the rectangle marque where the
legs go in the boots and copy paste that in a new layer.
Move that layer up untill above the boots layer.
Erase the parts you dont need up to the edge of the boots using the same
technique as in step 18 with the hat.
Then we can start redrawing the fur using the smudge tool again on size 2
strength 80. Vary the strenght of the brush and dont make the fur too much
here since we want to see the edges of the boot still shine a little thru the
fur. like on the result in this image.
Step 34
We continue our fur prject with the hat. Again go to the cat layer and select
the cats head where the edge of the hat is. you might have to do this in
several steps because the edge is a little rounded. start redrawing the fur
here too but make sure the strokes are not too long here… a cats hair and in
particulair this kind of cat is usualy a bit shorter on the head. I am sure
you are getting the hang of it allready and if not please go back to step 31
to refresh your memory on the fur smudging :). Also make sure you don’t
forget the ear 🙂
Step 35
Our next step is the feather on the cats head..
We use the same technique as we did with the fur but this time we set the
size of the brush bigger and the strength a little higher. Do vary it a
little but make the differences between the strength not as much as with the
fur. Make long strokes and make sure you vary the direction of the strokes a
little, also makes sure that not each stroke has the same length. look at my
result here 🙂
Step 36
Now we are almost done.
Well almost… we still have the rest of the cats fur to be redrawn back on…
Its something really worth to take the time for because it will make your
image look ten times better. Now you have so much experience redrawing the
fur on the cat you have to cover up the lil straw that the cat originally was
holding, with fur aswell..
And thats how I make a cat, rabbit, dog, bear or any other sort of animal
with fur, look like its NOT been hit by a grass mower. 🙂
Now If you want to add a photobackground to your image keep on reading.
Step 37
I was not done.. looking at my end result something was missing..
so I went back looking for another source image.. the back ground…
this is the one I found and decided to use.
Step 38
I have now linked all the cat layers in the psd with the cat. To do so, you
will have to keep your ctrl button pressed while you click with the left
mousekey on each layer of the cats attributes, including his clotes and
sword. By doing so you will see that each layer you selected turns dark grey.
Now click with the right mousekey on one of those layers and sellect “link
layers”. We allready had linked some layers so we just needed to link those
that wherent linked yet. You can also choose now to merge down all the cat
layers, theres 3 ways to do this.. 1- Click on the cats layer thats in top of
the list and press “ctrl” and “e” key. 2- right click on the top cat layer on
the list and select “merge down”. 3- Go to the menu while selected the top
cat layer like I show in this image and click there on “merge down”. You can
do so till all cat layers are merged… I myself usualy make sure I have a
copy of the psd with all the unmerged layers so I can go back and change
things if I want to later on.
Step 39
I have copy pasted the layer with my background image below the other layers
and dragged it with the free transform tool the size I wanted it, like i have
described before in step 12.
Step 40
As you can see the cat really looks like hes floating now… we are going to
change that and make him stand IN the grass and I will show how to make a
realistic shadow here using brightness / contrast settings. First we drag an
oval at the cats feet using the eliptical marquee tool. make sure you have
the grassbackground layer selected when you do this.
Step 41
Copy paste your marqueeselection onto a new layer and put that layer
inbetween the cat and the grassy background.
Select the cats boots and change its opacity so you can see the flowers thru
it well enough to work with it.
Go back to your new layer with the eliptical shape of the grassfield and
erase with a small soft brush all the grass that covers the boots but keep
the flowers with the stems! Make sure you only erase the grass that covers
the boots.
Step 42
Change the opacity of the boots and you will see it looks like the image as
in step 40. Duplicate the grassy layer where we just erased the grass from
the boots. and select the first of these two layers ( we are not going to
touch the top layer of the grass) Now we are going to redraw the grass the
same way we did the fur and the feather. If you forgot how please go to step
33 and refresh your memory :). You might have to play a little arround with
the size of the brush and the strength before you found a setting that you
are satisfied with. Since its grass and thicker as fur you will nee a bigger
brush and a little harder likely so you can drag the grass a little longer.
We dont have to redraw a whole lot but just enough so it looks like the boots
are realistic standing in the grass. When you start smudging be carefull that
you dont smudge the flowers and end up with yellow smudges.. if you do so by
mistake just undo (ctrl +z) or go to your history and go a step or more back.
Step 43
When you are finished with that we are going to make the shadow.
Look first to see if there are any other shadows in the image. Just so you
have something to compare with and to have an idea in what direction to place
the shadow. The tree here gave a good shadow and I am going to show you how I
made a simulair looking shadow for the cat.
Go back to the background layer with the field and the tree.
Draw again with the eliptical marquee tool to make an oval selection. We will
have to turn this selection a little bit into the same direction as we want
the shadow to go. Go to Select–>transform selction and turn the oval
selection till you are satisfied with the direction. Copy and paste this
selection on to a new layer and drag the layer on top of all the other layers
with grass.
Don’t worry about the parts that cover the grass we just draw and the boots,
we will correct that later.
Step 44
Now the oval is going to be transformed into shadow, using brightness and
contrast. select the layer with this oval and go to image—> adjustments–>
brightness/contrast.
Play with the settings untill you are satisfied with the color ( we want to
darken it to match the shadow color of the tree.) When satisfied click ok.
Drag the layer below the other layers with the ovals with the redrawn grass.
Now the last few things we have to do is erase the parts of these layers that
cover our new made shadow and make our shadow edges less sharp..
Merge the two grass ovals that we used to redraw the grass.
Use the erase tool ( not too large and hard brush) on that layer and erase
carefully the light grass that we did not redraw up to the edge of the boots.
Now go back to the shadow layer and take a large .. real large soft brush..
and erase carefull just the edges of the shadow so they arent so very hard
and sharp anymore.. dont erase too much though!
Step 45
Now I am done creating my puss in boots completely. You can save your work as
a jpeg or any other format if you like. I hope you find this tutorial
usefull.
Good luck with your own creations!
Tags: Photoshop, Photoshop Tutorials, Puss in Boots, tips and tricks, tutorial

December 31st, 2009 at 9:36 pm
December 31st, 2009 at 9:45 pm
January 3rd, 2010 at 11:54 am
February 5th, 2010 at 3:52 pm
February 7th, 2010 at 11:07 pm
April 8th, 2010 at 2:59 pm
April 9th, 2010 at 10:05 pm
April 29th, 2010 at 8:41 am
April 20th, 2010 at 8:19 am
April 29th, 2010 at 8:43 am
June 7th, 2010 at 9:54 am
June 10th, 2010 at 10:11 pm
June 16th, 2010 at 6:58 pm
June 22nd, 2010 at 10:23 pm
June 24th, 2010 at 1:21 pm
June 23rd, 2010 at 12:31 pm